Create Your First Neurographic Art Step-by-Step for Beginners

When I was first introduced to Neurographic Art I expected it to be like doodling. How wrong was I! I immediately saw the magic without knowing basically anything about it.
Neurographic art isn’t about artistic skill or making something “good”; it’s a simple process designed to calm an overwhelmed, busy mind.
Neurographic art is a simple drawing practice that helps calm the mind
and break the pattern of recurring stressful thoughts
Neurographic Art requires no art or creative skills —just a pen, some paper, and a few quiet minutes. We are focusing on the process not the outcome of the drawing.
If you’ve been hearing me talk about neurographic art and thinking, “Okay… but how do I actually do it?” — I will show you.
Whether you’re overwhelmed, overthinking, distracted, or just looking for a calming creative outlet, neurographic art drawing is one of the easiest ways to give your brain a breather. And no—you don’t need to be artistic. Promise.
Let’s walk through it together.
What is Neurographic Art?
Neurographic art is a simple drawing practice that helps calm the mind and break the pattern of recurring stressful thoughts that stress you out.
You start by drawing free-flowing lines, then rounding the sharp corners where those lines cross. As you do this, your brain begins to shift out of stress mode and into a calmer, more focused state.
The act of drawing interrupts old mental loops and gives your brain a chance to form new patterns — something scientists call neuroplasticity. Smoothing the sharp intersections signals resolution instead of tension, which helps your nervous system relax.
For Neurographic Art You Will Need

No need to rush out and buy all new art supplies for this exercise – although that is great fun too! You probably have everything you need already.
- A pen or fine-tip marker (black works great!)
- A blank sheet of paper
- Colored pencils or markers are optional ( I never met a color I didn’t love!)
That’s it. No fancy tools, no prep. Just a willingness to let your hand do its thing.
The Basic Neurographic Drawing Process
Here’s how to create your first piece, step-by-step:

Set a Simple Intention for Mental Clarity
Before you start, take a moment to check in with yourself. You can ask:
- What’s weighing on me right now?
- What do I need to let go of?
- What emotion do I want to explore?
You don’t have to overthink this. Just let one word or thought float to the surface—something like “stress,” “uncertainty,” or “I need calm.”
Remember to keep this simple. Overthinking is the exact opposite of what you will do.
For my first drawing my intention was ‘open mind’ and ‘not worry about the outcome’ because I had no idea what to expect!

The Soft Landing Kit
A free 7-day reset for overloaded minds
What you’ll get:
For anyone feeling heavy, scattered or emotionally full – this kit helps you stay grounded in spite of the stress!!
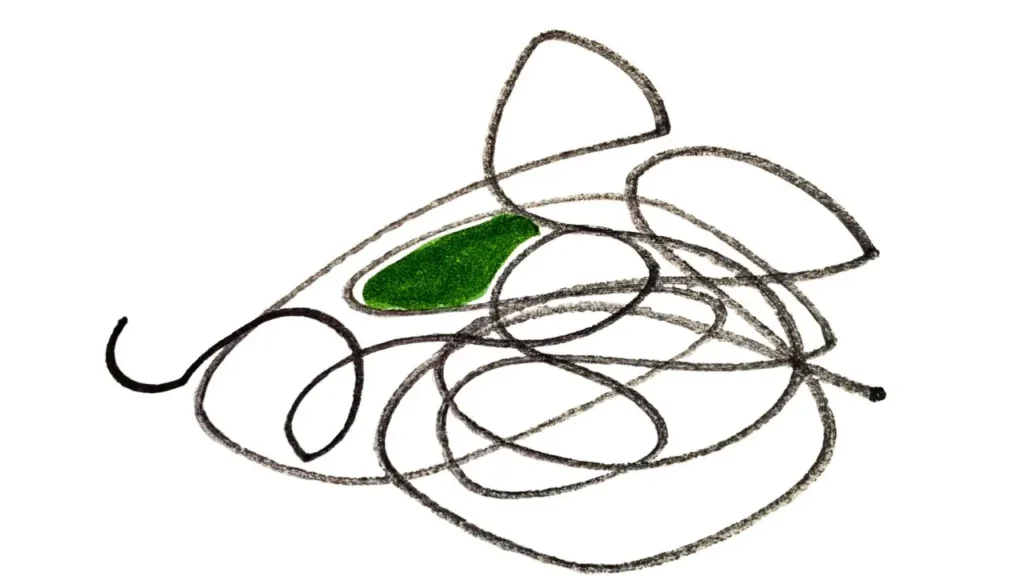
Draw Freeform Lines Across the Page
With your intention in mind, start drawing loose, wandering lines across the paper. Let them curve, overlap, and intersect. Don’t lift the pen too much. Let it flow.
Lighten the grip of your pen or pencils.

This step represents your current thoughts, energy, or emotional state—chaotic, smooth, tangled… whatever shows up.
Round the Corners Where Lines Intersect
This is the heart of the neurographic technique.
Anywhere two or more lines intersect or touch, draw rounded, curved shapes to soften the sharp edges. You’ll start to see bubbly or organic shapes form.
This part is incredibly soothing. It signals to your nervous system that it’s safe to slow down and soften.
I drew 3 purple lines, then I show you where the lines intersect. I softened the intersection of the purple lines with a blue marker.

To get you started – or keep you going, download my Free Soft Landing Kit! (link above) You will find 7 days of relevant writing and drawing prompts. See for yourself how a quick focused writing and/or drawing reset can impact your entire day.
Add Connecting Lines and Shapes
Once the corners are rounded, you can start to add more curves or lines that connect different areas of the page. This symbolizes new connections—between ideas, emotions, or even parts of yourself.
For this demonstration I added black dots at the various intersections. Soften the intersections any way you choose.
Don’t plan—just follow your instinct. Keep your mind open. Keep your pen flowing with a light touch. it feels like my hand knows where to go before my mind does.

Color In Areas That Call to You
Color is totally optional, but it’s a fun way to finish your piece. I have seen some way cool finished drawings I would hang in my home!
My drawings are not beautiful and they will never hang anywhere. I do my daily practice in under 15 minutes usually. Sometimes I go back and work on ‘yesterday’s’ page the next day- always with a set intention.
My practices are more on the messy side because I am focused on my intention, not the finished product.
Choose colors intuitively—don’t worry about matching or making it pretty. Let your body choose what feels right. Picking random colors sounds scary and in truth is fun for me.

Pause and Reflect
Once you’re done, take a moment to look at your drawing. What does it feel like? What changed as you drew? Note how you feel at the beginning of your practice and afterward.
I realized when I ended my first two plus hour drawing event I did not once think about the global state of affairs which has been weighing heavily on me.
It was a much needed vacation from my daily stresses. I was reminded how important it is for me to stop everyday even if I only can spare a few minutes and intentionally de- stress by doing some tried and true mindful exercises.
The little bit of time it takes to change my mindset pays me back ten fold in productivity and a lighter feeling throughout my day.
Tips for Your First Neurographic Art Drawing
- Go slow. This isn’t a race—it’s a reset.
- Don’t judge your work. There’s no wrong way to do this. Enjoy the process!
- Draw how you feel. Let the emotion move through your hand.
- Come back to it later. You don’t have to finish in one sitting.
🔗 Helpful Links for Going Deeper
- Start Here! What Is Neurographic Art?
- Explore: How Neurographic Art Helps You Declutter the Mind
First Neurographic Art Drawing
Your first neurographic drawing doesn’t need to be perfect—it just needs to be yours. I made my first drawing while away from home and all my art supplies. Just drawer a few lines on a piece of paper and see where it take you!
It was the ugliest piece of art this artist ever made because all I had access to were a few of my least favorite color markers and no idea what I was doing.
The end result was still phenominal because I felt like I just took a vacation.
Key Takeaways
- Neurographic art is about calming the mind, not making art
- No drawing skills or special supplies are needed
- The process matters more than the finished result
FAQ
See Where Your Neurographic Art Leads You!
You know what I did afterwards? Baked some white chocolate chip and cranberry brownies that were so incredibly awesome I wanted to eat the whole pan!
I am not a baker and I do not enjoy spending my time cooking. I do however love following where my heart takes me and for some odd reason it took me into the kitchen!
Give this a try, the drawing, not the baking! You might be surprised at how different you feel and where it takes you!
If you try this, notice how you feel afterward. That shift—however small—is the point.

Marj Bates “I’ve spent nearly 40 years in addiction recovery, decades with The Artist’s Way, and teach The Artist’s Way Reimagined™, a slower, more supported way to work through Julia Cameron’s book The Artist’s Way – blending creative recovery tools, neurographic art, and community to help people move through resistance and stay with the process.
I’ve also changed careers later in life than most people would dare — proof that it’s never too late to begin again.”
MindSketch Lab